Troubleshooting: Difference between revisions
(Created page with "So you just bought a new light and it doesn't work. Here are some pages that can help you troubleshoot what is wrong. Hopefully it will be something simple. At the very least the...") |
(fix blf link) |
||
| (5 intermediate revisions by 2 users not shown) | |||
| Line 1: | Line 1: | ||
So you just bought a new light and it doesn't work. Here are some pages that can help you troubleshoot what is wrong. Hopefully it will be something simple. At the very least these guides can help you pinpoint where the problem is. | So you just bought a new light and it doesn't work. Here are some pages that can help you troubleshoot what is wrong. Hopefully it will be something simple. At the very least these guides can help you pinpoint where the problem is. | ||
[http://budgetlightforum. | [http://budgetlightforum.com/node/250 Don's Budget Light walkthrough] | ||
[http://www.candlepowerforums.com/vb/showthread.php?227518 CandlePowerForums guide] | [http://www.candlepowerforums.com/vb/showthread.php?227518 CandlePowerForums guide] | ||
Basic troubleshooting boils down to: | |||
Does electricity get to the LED or bulb? | |||
===Batteries=== | |||
First, and easiest, test. Are the batteries in there? It seems pretty basic, but you have to check. | |||
If they are rechargeable, are the batteries charged? A voltmeter helps here, the cheapest ones are just as good as the most expensive ones for this sort of thing. | |||
Do the batteries work in another device of comparable current draw? | |||
Remember that a bright AA light can easily pull 2 amps from a cell - alkalines won't last long on that sort of usage. | |||
===The Switch=== | |||
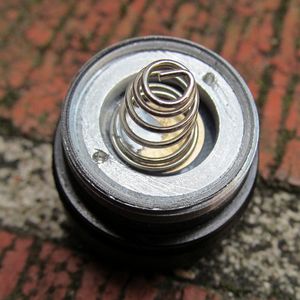
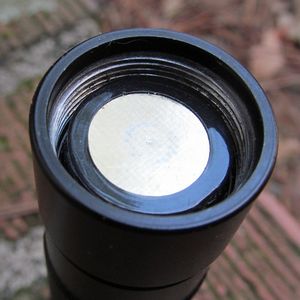
[[File:Tailcap.jpg|thumb|left|The tail of the flashlight showing the retaining ring with dimples.]][[File:Tail.jpg|thumb|End of flashlight with tail removed showing negative end of battery]]Most lights have a tail clicky that you can unscrew and reveal the battery in the tube and the body of the light. Remove the switch and use a wire or something metal to connect the negative of the battery to the body of the light. A paperclip is useful for this. Make sure you find a bare metal part, most metal coatings and anodizing do not conduct electricity. | |||
If it lights up, the problem is in the switch. Here is an [http://www.candlepowerforums.com/vb/showthread.php?t=236906 excellent guide] on using a voltmeter to test flashlights. | |||
Without getting too involved, one common problem with the tail switch is that the retaining ring isn't screwed down tightly. The ring usually has dimples in it and needlenose pliers can be used to screw that ring down tight. Not too tight, it just shouldn't be loose. | |||
If you have an amp meter, you can touch one probe to bare metal of the light and the other to the end of the battery. If no power is being transmitted, the problem isn't the switch. If a lot of power is being transmitted, but there is no light, there is an electrical short. This is '''very dangerous''' because shorting out a battery can cause it to overheat, vent, or explode.<br clear="all"> | |||
===The Head=== | |||
If it still doesn't light up, it is time to investigate the head end. Do the batteries touch the positive contact? Batteries can be a bit shorter or longer than they are meant to be. | |||
Sometimes the circuit from the switch is completed by the body tube screwing up tight against the driver in the head of the light. The body tube end will be bare metal (if the threads are bare metal, then this isn't as big a deal). Make sure the end of the body tube is clean. | |||
If power is making it to the head, it still has to reach the driver and sometimes there is a gap between the outer ring holding the driver and the driver itself. In most Chinese-made lights there is a blob of solder that bridges this gap, but it may not be making good contact or could be missing. There is a good example of this here: [http://budgetlightforum.com/node/932#comment-13924 poor soldering]. If you have a soldering iron, a quick blob of solder will fix this problem. | |||
If these measures fail, it gets more complex.If you remove all the problematic contact points and put the head of the battery against the positive contact in the head and then connect the tail to the outer rink on the driver, and the light still doesn't light up, then the driver could be dead (only way to fix that is with a new driver) or the LED could be burned out (unlikely unless it looks brown instead of yellow). Or there could be a bad solder connection either to the star that the LED is attached to, or with the leads that connect connect to the driver board. | |||
===Flickering=== | |||
Flickering is almost always caused by a loose connection. Maybe the tail switch isn't screwed down tightly. Or it could be dirty threads. Use a soft cloth to clean off the threads, especially any bare threads which may be used to transmit electricity from one part of the light to another. | |||
===Doesn't stay lit=== | |||
Probably a loose connection somewhere. It could also be the LED isn't mounted properly and the heat being generated by the LED can't dissipate. If the LED is loose, you will need to clean off the bottom of the LED board and use some thermal adhesive to attach the LED to the pill. Also it could be weak batteries as some lights have low battery protection. | |||
Latest revision as of 13:56, 6 April 2013
So you just bought a new light and it doesn't work. Here are some pages that can help you troubleshoot what is wrong. Hopefully it will be something simple. At the very least these guides can help you pinpoint where the problem is.
Don's Budget Light walkthrough
Basic troubleshooting boils down to:
Does electricity get to the LED or bulb?
Batteries
First, and easiest, test. Are the batteries in there? It seems pretty basic, but you have to check.
If they are rechargeable, are the batteries charged? A voltmeter helps here, the cheapest ones are just as good as the most expensive ones for this sort of thing.
Do the batteries work in another device of comparable current draw? Remember that a bright AA light can easily pull 2 amps from a cell - alkalines won't last long on that sort of usage.
The Switch


Most lights have a tail clicky that you can unscrew and reveal the battery in the tube and the body of the light. Remove the switch and use a wire or something metal to connect the negative of the battery to the body of the light. A paperclip is useful for this. Make sure you find a bare metal part, most metal coatings and anodizing do not conduct electricity.
If it lights up, the problem is in the switch. Here is an excellent guide on using a voltmeter to test flashlights.
Without getting too involved, one common problem with the tail switch is that the retaining ring isn't screwed down tightly. The ring usually has dimples in it and needlenose pliers can be used to screw that ring down tight. Not too tight, it just shouldn't be loose.
If you have an amp meter, you can touch one probe to bare metal of the light and the other to the end of the battery. If no power is being transmitted, the problem isn't the switch. If a lot of power is being transmitted, but there is no light, there is an electrical short. This is very dangerous because shorting out a battery can cause it to overheat, vent, or explode.
The Head
If it still doesn't light up, it is time to investigate the head end. Do the batteries touch the positive contact? Batteries can be a bit shorter or longer than they are meant to be.
Sometimes the circuit from the switch is completed by the body tube screwing up tight against the driver in the head of the light. The body tube end will be bare metal (if the threads are bare metal, then this isn't as big a deal). Make sure the end of the body tube is clean.
If power is making it to the head, it still has to reach the driver and sometimes there is a gap between the outer ring holding the driver and the driver itself. In most Chinese-made lights there is a blob of solder that bridges this gap, but it may not be making good contact or could be missing. There is a good example of this here: poor soldering. If you have a soldering iron, a quick blob of solder will fix this problem.
If these measures fail, it gets more complex.If you remove all the problematic contact points and put the head of the battery against the positive contact in the head and then connect the tail to the outer rink on the driver, and the light still doesn't light up, then the driver could be dead (only way to fix that is with a new driver) or the LED could be burned out (unlikely unless it looks brown instead of yellow). Or there could be a bad solder connection either to the star that the LED is attached to, or with the leads that connect connect to the driver board.
Flickering
Flickering is almost always caused by a loose connection. Maybe the tail switch isn't screwed down tightly. Or it could be dirty threads. Use a soft cloth to clean off the threads, especially any bare threads which may be used to transmit electricity from one part of the light to another.
Doesn't stay lit
Probably a loose connection somewhere. It could also be the LED isn't mounted properly and the heat being generated by the LED can't dissipate. If the LED is loose, you will need to clean off the bottom of the LED board and use some thermal adhesive to attach the LED to the pill. Also it could be weak batteries as some lights have low battery protection.