AVR Drivers
Some drivers have an Atmel microprocessor on board to control different modes. This microprocessor controls the number of modes, the brightness of the modes, the different flashing modes (strobe, SOS, etc.), mode memory, and low battery warnings. Atmel processors are programmable therefore the same driver can be loaded with different settings to customize the light with whatever features you want. This page will summarize some of the things you will need if you want to program your own drivers. This is based on a Budget Light Forum discussion thread where you can go for help or to get answers to your questions. This whole thing was started by a BLF member, Tido.
All of this is based on AVR tools developed for Atmel chips, which is mostly open source (free). Wikipedia article. ISP means "In System Programming," in other words, the chip can be reprogrammed while still soldered in place.
Things You Will Need
Flashlight Drivers
Of course you will need a flashlight driver circuit board first. The stock driver in some flashlights already has an Atmel driver on board. There are also several NANJG drivers available that include an Atmel TINY13A chip that can be programmed. ATtiyny13A can also be locked down (low fuse higher than 0x7F) so they can't be changed easily, but so far none seem to be. However, some variants of NANJG drivers use a PIC chip that can not be programmed with AVR tools, as well as Kaidomain driver doesn't use ATtiny13A. See Popular drivers to see some of the drivers people have been using. Most of these use current regulators to limit the current delivered to the LED while the Atmel chip itself turns the power on and off very quickly, leaving it on for full power, or flashing on and off quickly to simulate a lower mode. As the percentage of off time increases, the light gets dimmer. By setting the on-off cycles to a high frequency, the eye just sees this as a lower mode even when the LED is barely lit. This is called Pulse Width Modulation (PWM). By slowing the flashing more, you get a visible strobe mode or SOS modes. So essentially the Atmel chip is just a computer-controlled on-off switch.
The Atmel ATtiny13A has an 8-bit processor with 1 kb of flash memory, 64 bits of RAM, and 64 bits of EEPROM that can be written several thousand times. There are also settings called "fuses" which can be set or cleared.
Hardware
Programmer
You will need two pieces of hardware: an AVR ISP programmer that attaches to your computer's USB port and a clip to attach to the Atmel chip which is already soldered in place.

There are a number of ISP programmers available, including one called USBTinyISP that you can build yourself from a kit. Ironically, it uses an Atmel chip as well which must be programmed before it can be used as a programmer. There are also a number of cheap drivers available on eBay if you search for USBASP. These all look similar with an exposed blue circuit board and cost about $12, usually including a ribbon cable, which you probably won't need.
SOIC Clip
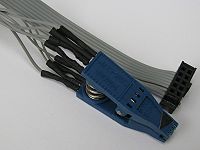
The other piece of hardware is a SOIC 8 clip to attach to the pins of the Atmel chip on the flashlight driver. There are cheap blue ones on eBay made by Pomona that have been very problematic, but sometimes work. They cost about $12. It is best to get one with a ribbon cable that attaches to pins coming out of the clip. The individual wires of the ribbon cable can be moved to the correct pins for the ISP programmer. See below for the proper configuration. There are more expensive ones on eBay made by 3M that might work better. These are black, cost about $21, and don't seem to include the cable. The programmer itself includes a cable but you will need some way of connecting the wires in the ribbon cable to the pins sticking out of the clip.
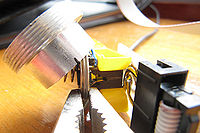
Clip alternative: You may be able to get by without a clip, by soldering leads to the chip temporarily. BLF user HID45 soldered pins only to the corner legs of the chip which is way easier than trying to solder adjacent legs, and then manually holds leads on the other two legs while someone else runs the computer. There's a picture here.
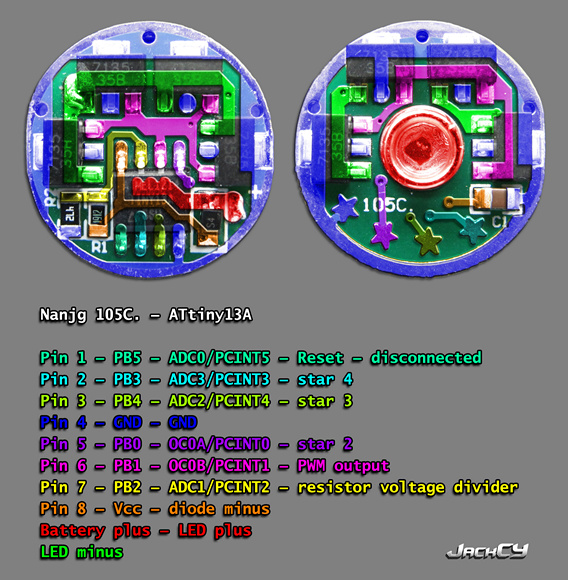
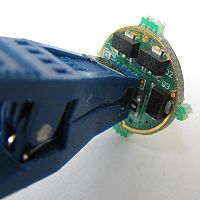
Nanjg105c clip: You can as well improvise and make something for your specific driver.
DIY SOIC clip: There is also an option to make the clip yourself from spare parts if you have the time, tools and precision. Translated version with a custom PCB layout provided. How to build a SOIC programming clip.
Software
You need some kind of software to interface with the USB programmer to read or load programs into the Atmel chip.
Different operating systems will have different software available, for more info or at least some info about Mac look here, for Unix here. Windows is quite straightforward.
Downloader/Uploader
You will at least need a downloader and uploader to modify the Atmel chip.
AVRDUDE - It is a command line interface (DOS). If you use Tido's programs then you don't need to compile anything: those programs are ready to be loaded. If you install MHV AVR Tools/WinAVR, AVRDUDE will be included. Does not support ATtiny13A, have to use a workaround and pretend it's ATtiny13.
eXtreme Burner - AVR - Or if you do not like AVRDUDE and want something with GUI, you can try eXtreme Burner - AVR, download latest version at the bottom of the page under release. It can read/write (download/upload) and it also has the required driver for USBasp in the installation. If you only want to write a new firmware (already compiled Tido's, DrJones's, ...) this should be all you need. Does support ATtiny13A. Does not seem to write correctly nlite driver though. Either does not understand the hex format or ATtiny13A write support is bad. It reads and erases fine.
USBasp Driver
You may also need to install a driver for your USBasp. I've used the cheap eBay USBasp pictured above (a Fischl clone) and latest driver from libusb-win32 project. Should work on all Windows 98 and newer. The software package has a wizard application, connect your USB device, run the wizard, select your connected USBasp and the wizard will generate a driver for that devices for you. Then install the generated driver by running it's installer.
Compiler
If you want to customize Tido's programs you will need a C compiler configured to work with AVR equipment. (Some people write AVR programs in assembly language which gives more compact programs, but you are on your own if you go that route.) You have one option: AVR-GCC. Either install it with everything you need from MHV AVR Tools (optionally older WinAVR) or install Atmel Studio that contains everything you will need as well apart from AVRDUDE, AVR Studio 6.1 or older can't upload via USBasp and you will need AVRDUDE or other downloader/uploader.
Integrated Development Environments
Atmel Studio - Atmel Studio (newer AVR studio, it's been renamed) is available free from Atmel to allow you to write and compile programs and load them. It has a neat interface for some programming boards, but not USBasp (it seems it still can't upload using USBasp without external tool like AVRDUDE), so if you are using USBasp, you will still need AVRDUDE to actually upload the files. The latest version is called Atmel Studio 6 which runs on Windows and uses MS Visual Studio Shell and .NET 4.0 (both installed automatically).
Eclipse IDE for C/C++ Developers - is a free IDE that goes on top of AVRDUDE and AVR-GCC and is what Tido uses. It requires a plug-in that allows it to work with AVR. Follow instructions here for installing WinAVR and Eclipse with AVR Eclipse plugin. Then configure Eclipse for AVR, you can see more in this different instructable. There is also a Wiki about Eclipse AVR. AVR Eclipse seems to have glitches with latest Eclipse 4.2 Juno, use older Eclipse 3.6 or 3.7 instead. AVR Eclipse is again a little out of date. With 4.2 if you enter properties of your project and it wants to open with AVRDUDE settings showing it will not read them and throw you an error window, cancel and open it again, this time it will open with other settings showing and the AVR settings will load properly. I would advise you to get the latest version that AVR Eclipse plugin supports, not necessarily the latest Eclipse unfortunately.
AVRDUDE, GCC, LIBC, ...
MHV AVR Tools - A WinAVR replacement since WinAVR development is stopped. It has newer AVRDUDE, AVR-GCC and AVR-LIBC along with other packages. It can be used in combination with AVR Eclipse or anywhere else the same way as WinAVR as an external tool like in Atmel Studio to provide AVRDUDE or compiler (AVR-GCC) to the studio.
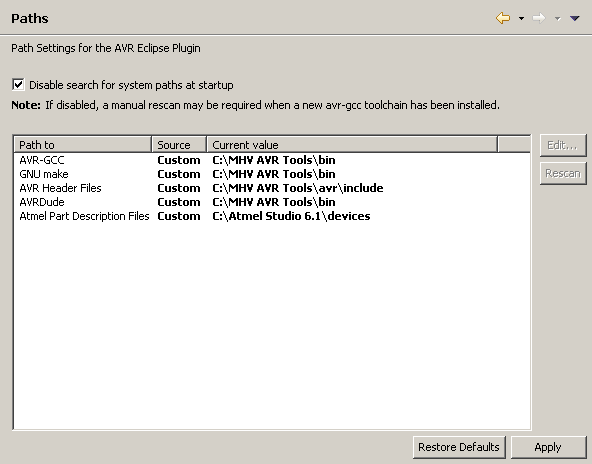
WinAVR (not developed anymore) - WinAVR is a free collection of all the software you need as well as a graphical user interface (GUI) to edit, compile, and load programs.
As with all bundled software and drivers, they may be out of date. Right now, MHV AVR Tools seem to be up to date but eXtreme burner AVR has bundled older USBasp driver. WinAVR is completely out of date as is AVR Eclipse plugin.
BLF-VLD
Tido created the original files that can be used, called the BLF-VLD (Budget Light Forum Versatile LED Driver). If you go to the first entry of the thread How To Build a Flashlight With Perfect Modes, you will find a link to the latest zip archive of the files you need. This zip archive includes a helpful readme file.
Without writing any code, you can choose from three configurations that Tido has already written:
Simple is a 3-mode setup with Low, Medium, and High. It includes mode memory (if light is on for 2 seconds or more, the mode is memorized when the light is turned off) and a low battery warning.
Extended has hidden modes that can be accessed by running through all of the modes quickly. By default you run 3 modes, but can reach other modes if you want.
Programmable allows you to assign any of the extended modes to your 3 simple modes.
The BLF-VLD archive also has a very good README file in the "docs" folder which explains about the code and the three different configurations.
Getting Ready
Set up your clip
Match the pins of the Atmel chip with the pins of the USB programmer. Only pins 1, 4, 5, 6, and 7 of the Atmel are used by the ISP programmer (maybe pin 8 VCC is used).
The pins of the ATMEL chip are
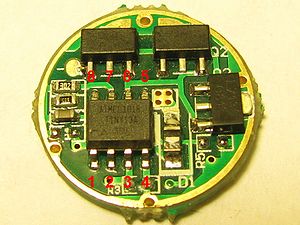
| 8 VCC | 7 SCK | 6 MISO | 5 MOSI |
| 1 RST | 2 INP | 3 INP | 4 GND |
The programmer is 10 pins however which are set up one of two ways.
Old Style:
| Pin | Function | Function | Pin |
|---|---|---|---|
| 1 | MOSI | VCC | 2 |
| 3 | NC | GND | 4 |
| 5 | RST | GND | 6 |
| 7 | SCK | GND | 8 |
| 9 | MISO | GND | 10 |
New Style, for the USBASP V2.0:
| Pin | Function | Function | Pin |
|---|---|---|---|
| 1 | MOSI | VCC | 2 |
| 3 | xxx | TXD | 4 |
| 5 | RST | RXD | 6 |
| 7 | SCK | GND | 8 |
| 9 | MISO | GND | 10 |
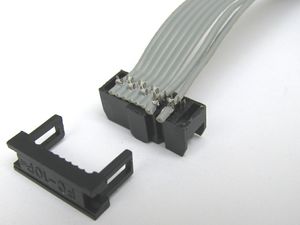
Old Style: So Wire 1 (MOSI) of the ribbon cable from the programmer must attach to Pin 5 of the Atmel. Make sure you mark which side of the clip attaches to the top of the Atmel or everything will be misaligned next time you use it. Line up RST and SCK with their appropriate wires. But notice that MISO on the programmer is Wire number 9 and the ribbon only has 8 wires. You will need to disassemble the end of the ribbon cable at the controller end and move wire 8 over to the 9 position so that MISO lines up correctly.
Communication with the Atmel chip is via Serial Peripheral Interface (SPI, see Wikipedia article) with the ISP programmer a Master and the Atmel on the driver board a Slave. SCK is Serial Clock so they are in sync. The ISP programmer talks on the MOSI line (Master Ouput, Slave Input) while the Atmel talks back on the MISO (Master Input, Slave Output) line. RST is reset.
Test the connection
Now everything is installed and set up. You should be able to plug in your USB programmer with the cable leading to the clip. Attach the clip to the Atmel chip right-side up with at least the 5 critical pins wired correctly.
Be aware that AVRDUDE does not officially support ATtiny13A and you will be using AVRDUDE with ATtiny13 setting "-p t13" instead of unsupported "-p t13a". The difference I found were lock bits when reading with ATtiny13A with it's proper setting (0xFC) compared to ATtiny13 setting (0x3C), important are the lowest 2 bits so the final lock bits are for both ATtiny13A and ATtiny13 setting reported correctly despite ATtiny13 setting reporting wrongly the higher bits when used on ATtiny13A chip. Otherwise it could work if you know what you're doing. On a typical Nanjg105C both lock bits are set (zeroed, 0xFC) and programming can only be done after chip erase that is automatically done by avrdude when new flash memory is written with -U parameter. That most likely also prevents reading of the original firmware, which can be read but due to lock bits may be read as garbage/nonsense and cannot be used as backup.
Now open a command window in Windows (or whatever you are in) and typing this command at the C: prompt:
avrdude -p t13 -c usbasp -n
The command above calls up avrdude. "-p t13" means you are talking to an Atmel ATTiny13 chip (but could unofficially work with ATtiny13A as well and most use it so). "-c usbasp" says you are using the USBASP controller. "-n" means no writing, since we're not actually doing anything yet. With USB, you shouldn't have to enter the port number, but some people have to go find out what port the USB is assigned to and if it is Port 2, they add "-P com2" after usbasp.
The command above should generate a message that the AVR device is initialized and ready to accept instructions. If the connection is not working, you will get something like
 avrdude: warning: cannot set sck period. please check for usbasp firmware update
 .
 avrdude: error: programm enable: target doesn't answer. 1
 avrdude: initialization failed, rc=-1
        Double check connections and try again, or use -F to override
        this check.

 avrdude done.  Thank you.
So if you get that, check your clip wiring and make sure your clip is getting a good connection. The clips are very finicky and sometimes need some repairs. You can check continuity with a DMM from an individual tooth on the clip back to the pad on the USB board. TIP: In the command prompt window you can use the up arrow key to recall the last command you typed in.
If everything is working you will get a message like the following:
 avrdude: warning: cannot set sck period. please check for usbasp firmware update
 .
 avrdude: AVR device initialized and ready to accept instructions

 Reading | ################################################## | 100% 0.03s

 avrdude: Device signature = 0x1e9007
 avrdude: current erase-rewrite cycle count is 808793655 (if being tracked)

 avrdude: safemode: Fuses OK

 avrdude done.  Thank you.
Once you get the message that everything is working, you can move on to the next section.
Download settings
Use the software and hardware to download the existing program from the Atmel chip on the flashlight driver. You will need this if your programming doesn't work and you want to reset the driver to how it was originally. Get fuse settings too. (Actually it is not clear if getting original settings will do any good at all, so if you need a backup, try NLITE, mentioned in the next section).
avrdude -p t13 -c usbasp -u -Uflash:r:flash-dump.hex:i -Ueeprom:r:eeprom-dump.hex:i -Ulfuse:r:lfuse-dump.hex:i -Uhfuse:r:hfuse-dump.hex:i
The command above will create 4 files on your hard drive for the flash memory contents, eeprom, high fuses, and low fuses. -U tells the programmer to perform a memory action, followed by the type of memory ("flash", "eeprom", "lfuse" for low fuse (that's not the number 1), or "hfuse" for high fuse). The :r: part of the command tells the programmer to read settings into the files. And "i" tells it to format the files in Intel hex. See these AVRDUDE instructions for a complete list of commands and meanings.
Upload new settings
When you upload new settings, you are wiping out the settings that the driver came with. Therefore if there are stars on the back that you have connected to get different mode combinations, that will be ignored (the stars are connected to legs of the Atmel chip that won't be used). It doesn't seem you can actually install old settings back into the driver. Instead you can install a similar one called NLITE located at BLF. It is 3- or 4-mode with options for mode memory and order of modes (Low to High or High to Low) based on how the stars are soldered.
Open a command window in one of the BLF-VLD subdirectories: "Fixed Modes", "Programmable", or "Simple". With everything hooked up, enter this command:
avrdude -p t13 -c usbasp -u -Uflash:w:BLF-VLD.hex:a -Ueeprom:w:BLF-VLD.eep:a -Ulfuse:w:0x79:m -Uhfuse:w:0xed:m
The :w: part of the command tells the programmer to write settings from the files for flash memory and eeprom and to set the values of the low and high fuses to the hexadecimal values shown. :a is for automatic file type detection, :m indicates "immediate mode" (use the hex values given).
Always keep low fuse at 0x7F or lower value to ensure that SPI programming is enabled. Values 0x80 or higher will lock the ATtiny13A and it could only be reset in other more complicated ways.
nlite
avrdude -p t13 -c usbasp -u -Uflash:w:nlite.hex:a -Ulfuse:w:0x75:m -Uhfuse:w:0xFF:m
nlite runs 4.8MHz clock, start up 14CK + 4ms, fast PWM at around 18kHz. BLF-VLD uses phase correct PWM at 9kHz by default.
eXtreme burner maybe does not understand nlite.hex file and verification fails, or it can't write correctly ATtiny13A at all. Use AVRdude instead.
Compile your own code
If you use the standard BLF-VLD files, you don't need to compile anything. But if you write your own code or modify the BLF-VLD files, you will need to compile your own files. By doing this you can have different numbers of modes, different brightness levels, turn off the memory function so that the light always comes on in the same mode, etc.
To customize the interface, use the file driver.c in the BLF-VLD directory. This file has code for all 3 standard configurations in one file. There is a good example of how to configure a light to 4 fixed modes with no memory in this comment to the main thread. You modify it by commenting out different lines that define functions or setting parameters, like the number of modes. There are a lot of comments in the code itself and the readme file included in BLF-VLD gives instructions.
If you are using AVR Studio 5, you will need to start a new project, maybe called "MyProject". Start AVR Studio 5 and go under File and New Project and give it a name (MyProject) and location (can go in BLF-VLD or its own directory on the C: drive). After you click OK, it will ask you what type of board you will program. Choose ATtiny13A. It will now generate some simple code for a blank program. Open up driver.c in a text editor, copy all of that, then go back to AVR Studio and paste it in over the simple code that was already generated for you. Go under the Project menu heading and select MyProject Properties. Where it says Generate Files, check the boxes for hex and eep. These are the files that will be transferred to the chip.
Line 1029 of the code declares a variable type within a "for" loop which is not allowed in the type of C that Visual AVR supports (needs support for C99). You can fix the code easily enough by changing:
for(uint8_t i = 0; i < 2; ++i){
to:
 uint8_t i;
 for (i=0; i < 2; ++i){
Now you can compile the project. Go under the menu heading Build and choose Build MyProject. This will create the files you need in MyProject/MyProject/Debug. If you are using a programming board that AVR Studio supports (USBasp and most others are not supported), you can move the files and change fuse settings from within AVR Studio. Otherwise you should have WinAVR installed on your computer (or at least AVRDUDE) and use AVRDUDE commands to upload the files to your driver as described above.
See Modifying BLF-VLD for programming notes.
Checking program size
AVR Eclipse and Atmel studio can show you size of the program after compilation. If you want to check it otherwise, use avr-size as shown below.
C:\BLF-VLD\Programmable\avr-size -C --mcu=attiny13a BLF-VLD.elf

AVR Memory Usage
----------------
Device: attiny13a

Program:     968 bytes (94.5% Full)
(.text + .data + .bootloader)

Data:         26 bytes (40.6% Full)
(.data + .bss + .noinit)

EEPROM:       64 bytes (100.0% Full)
(.eeprom)
The ATtiny13A provides the following features: 1K byte of In-System Programmable Flash, 64 bytes EEPROM, 64 bytes SRAM.
ATtiny13A maximum:
- Program: 1024 bytes
- Data: 64 bytes
- EEPROM: 64 bytes
And yes, the same source program will have different machine code size and slightly different machine code when compiled with different options and different versions of AVR-GCC. Original Tido's programmable ELF has a size of Program: 1004 bytes (98.0% Full).
Optimizations
If you want a smaller code, use optimization for size for your compiler configuration. GCC uses "-Os" and you can find more useful optimizations and tricks via search, on AVR Freaks or elsewhere. Sometimes older GCC versions generate smaller code than the newer ones. Atmel uses AVR-GCC in it's toolchain as well, and currently it's the same version as in MHV AVR Tools.
In general:
- turn off debugging information and capabilities for release version
- optimize for size with general setting like "-Os"
- optimize for size with other custom settings
Other Issues
Mode Memory Some flashlights will remember the last mode they were in. Often the mode will be remembered after the light is off for a couple of seconds (if it was too short an interval you couldn't change modes by half-pressing the tail clicky to off briefly). But NANJG drivers usually have memory that sets after the light is on for a couple of seconds. When you turn the light off, it will come back on in the last mode, but if the light was on for less than 2 seconds, it will come back on in the next mode. This works pretty well except that if the light is on for a couple of seconds and you want to change modes, you will have to half-press the clicky once and end up in the same memorized mode, and then again to change the mode. The reason for memory to be this way is that when power is cut to the driver, it can't write to its memory. But it is easy for the memory to be written while the light is on and a timer can be used to write to the memory after the light is on for a couple of seconds. In order to get conventional memory, a capacitor would have to be added to hold on to power long enough after the power is turned off for the driver to write to its memory. BLF user sixty545 has done just this, described here.
Low Battery The ATtiny chip can not monitor voltage through its VCC pin, however, it can monitor voltage via an ADC input channel pin as long as the voltage is within measurable range of 1.1V internal reference voltage. Therefore the battery voltage must go through a couple of resistors to be divided to a readable level. Then the software can have calibrated values so that the user is warned of a low battery by the brightness dropping or the light flashing periodically. Or do anything else the user wants when low voltage is detected.
Drivers
Nanjg 105C.
Program capabilities vary between drivers of the same name as every supplier/shop has different versions. Nanjg 105C. exists in two basic models: 2 group selectable by clicking, 4 group selectable by stars. And other are available with various output levels and mode combinations as well as different number of AMC7135s (350 or 380mA versions) that limit maximum output current.
