DIY P60
Building your own custom P60 allows you to pick out whatever LED and driver you want to make a P60 drop-in perfect for you.
Things you will need
Parts:
- Empty drop-in. This includes brass pill, reflector, big spring, and little battery spring.
- Driver. The circuit board. See Popular drivers for some examples. Usually includes leads to the LED.
- LED. Make sure you get one already mounted to an aluminum board, no bigger than 16mm diameter.
- Isolation disk. Or you can make your own. Keeps the aluminum reflector from making electrical contact with the LED board.
Tools:
- Soldering iron
- File to smooth edges and shape the circuit board
- A vise to hold the work
- Magnifying lens or jeweler's loupe to check your solder joints
- Digital multimeter (DMM) to check continuity
Consumables:
- Thermal adhesive or epoxy
- Solder
Parts
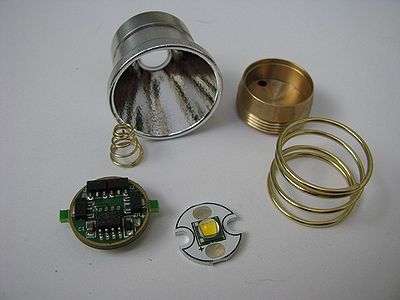
The drop-in There are a lot of drop-ins available. Most have an 18mm diameter brass pill (some are aluminum) and come with a big spring that bears against the head of the flashlight and presses the reflector against the glass. With some hosts, you don't need this spring. The drop-in also has a small spring that will be soldered to the bottom of the driver board to make contact with the positive end of the battery. Some driver boards already have a spring there. The biggest difference between drop-ins is the reflector. You can choose smooth (SMO) or orange peel (OP). Smooth usually has a little better throw but may show artifacts or rings in the beam. OP will tend to reduce throw, have a little more spill, and smooth out any beam artifacts. OP is more common, but SMO works fine with XP-G and XM-L LED's. The other variable in reflectors is the hole at the bottom for the LED. Many times the hole is 7mm which is big enough for the metal ring around XR-E LED's, but is also ample for larger die LED's like MC-E and XM-L (a P7 or SST LED requires an even larger hole). Some reflectors have a smaller hole for XP-E and XP-G LED's. The shape of the bottom of the LED can be important as well since it will fit over the LED board and connections.
LED The LED should already be mounted to an aluminum board which will have solder pads for connections to the negative and positive leads from the driver. Unmounted LED's can be mounted to a board using reflow soldering, which is more than most people want to deal with. 18mm boards or larger simply won't fit. A 16mm board is a tighter fit and 14mm is about perfect. Smaller boards and square boards are sometimes used as well. The boards usually have indentations in the edge so the board doesn't block the holes where the leads will come up out of the pill.
Driver The driver should be 17mm in diameter. This is the most common size anyway, but still requires some very tiny soldering joints. The key thing with the driver is that you pick one that will work with the battery voltage you are supplying and with the LED you want to use. Sometimes the leads are already soldered to the driver, which is helpful. There is usually a solder pad marked with a + for the positive lead to the LED. Sometimes the negative to the LED is marked by a -, but not always. Look on discussion boards if you aren't sure. The drivers themselves usually don't have instructions.
Mount the LED
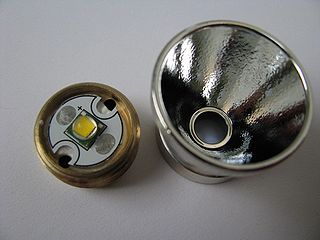
The LED needs to be mounted to the brass pill so that the pill can soak up heat produced by the LED. Use a very small amount of thermal adhesive or thermal epoxy to get good contact between the LED board and the brass without any air gaps. But even the best thermal epoxy will get in the way of the heat transfer so use as little as possible. More is not better. An epoxy like Arctic Alumina or Arctic Silver works great, but once it sets it will be impossible to remove the LED without damaging it. A silicone thermal adhesive like Fujik from DealExtreme seems to work fine and can be removed. Some people might choose to use non-adhesive thermal compound instead of adhesive, but then the only thing holding the LED in place is the soldered lead wires and pressure from the reflector.
You want the LED centered on the pill for the best beam quality. You can get it close by eye and then screw a reflector over the LED (don't tighten it all the way down or it could move the LED) to make sure the LED is in the middle of the opening. If the reflector has a big enough hole you may be able to make adjustments with the reflector in place. Once the LED is centered, you can clamp LED down until the adhesive sets. Use something hollow like a pen cap over the LED so you don't damage the dome. Once the adhesive sets up, check the centering again to make sure it didn't shift.
Get the driver ready
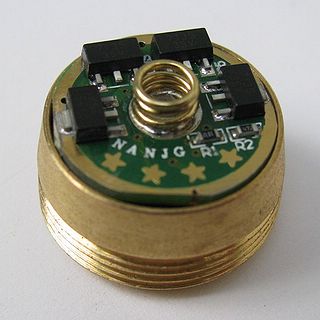
In the picture above you can see the driver still has nubs left over from the production of the circuit board. These need to be filed down so that the driver will fit snugly in the bottom of the pill. It is helpful to file one side of the driver flat so that you can pry the driver out of the pill with a small flat head screwdriver. Test the fit as you file down the nubs. Sometimes drivers run a little large or small.
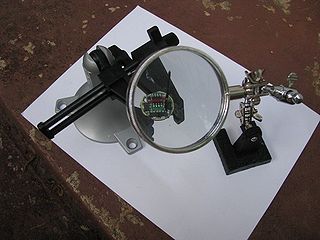
Next you will need to solder the leads to the driver board. The black wire connects to the negative pad and the red one to the positive. This can be challenging because the board is small and the wires are surface mounted to small pads. It helps to silver the ends of the leads with solder so they will stick better. It may also help to bend the exposed wire ends. It is nice to have some kind of vise to hold the driver and a magnifying lens doesn't hurt either. Once the leads are in place, give them a tug to make sure they are on there good and use your DMM to test that there is not a short between the positive and negative pads due to oversoldering.
Wire the LED
Now you can thread the lead wires up through the holes in the pill. Make sure the red wire is in the hole closest to the LED's positive pad and the black one in the hole closer to the negative. You can twist the driver as you get closer to the pill to use up any slack in the leads. Place a little drop of solder on each of the LED pads. While holding the bare end of the lead down to the pad, touch the solder and wire with the soldering iron to get it to stick. The wire should be completely covered, but you don't want this joint to be raised very high or it won't allow the reflector to screw down as far as it should. Make sure the bare ends of the wire are not contacting the aluminum base or you could get a short. Use your DMM to make sure there is no continuity between the positive and negative pads of the LED.
Once this is done, you can test the drop-in by holding the positive end of the battery up to the middle of the driver board and then use a piece of wire to connect the negative end of the battery to the brass pill. The LED should light up. If the driver has modes, you can test whether they are working by breaking contact and then touching the pill again with the wire. If it doesn't work, then check your soldering.
Finishing up
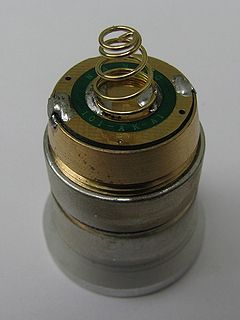
If the LED is working, you can go ahead and solder the driver board to the pill. This isn't easy to do because the pill will soak up the heat from the soldering iron. It is easy to get a blob of solder on the outer ring of the driver, but harder to bridge over to the pill. However this is essential, not just to hold the driver in place but to complete the path from the negative end of the battery, through the switch, up the metal body tube of the flashlight, to the pill, and to the driver via the solder bridge. Try to get two good solder bridges in place. Use your DMM to make sure there is continuity between the pill and the outer ring of the driver. If there are any spikes sticking out of the side of the pill, you can file them down.
Usually you also need to attach the small spring to the bottom of the driver board. Put two blobs of solder on the outer parts of the center of the driver. Then put the spring in place and re-melt the solder. It is essential for the spring to be very secure. If it comes loose, it could cause a short between the negative and positive parts of the driver board. This would produce a dead short for the battery when the light is switched on, possibly causing a fire or explosion. Give the spring a good tug and check it from time to time as you use the light to make sure it is not coming loose. If you turn the light on and it does not light up, turn the light off immediately and make sure there is not a dead short.
With the spring in place, you can put an isolation disk over the LED and screw down the reflector. Since the reflector is made of conductive aluminum and would otherwise touch the two solder points on the LED board, the isolation disk is essential to avoid a short. Attach the big spring to the pill and screw the reflector down (sometimes the big spring isn't needed). Now you can put the drop-in in a light and see if it works!